
Reusing OEM Mounting Hardware on Aftermarket Fairings: Which Bolts, Clips, and Grommets Survive the Swap
Riders, aftermarket fairing manufacturers, and repair shops swap factory bodywork for aftermarket fairings all the time. What they find is that the panels matter less than the OEM mounting hardware reused with them. The bolts, clips, and grommets that come through the swap decide whether panels line up, whether gaps stay even, and whether the fairing holds steady against vibration and road load. Reuse sound fasteners and an aftermarket kit seats cleanly and stays quiet. Reuse worn, mismatched, or wrong-thread hardware and even a well-molded fairing can rattle, crack at the mounting points, or refuse to sit flush. Three hardware families determine whether an aftermarket fairing swap fits cleanly:
- Bolts – shoulder, flange, and fairing bolts whose length, thread pitch, and diameter must match the OEM mount points without over-compressing the plastic.
- Clips – push-type, U-nut, and spring clips that grip the panel edge and set the alignment gap between fairing and frame.
- Grommets – rubber isolators and well nuts that absorb vibration and protect the plastic from cracking around each fastener.
Each family wears differently and has its own limits for reuse. The sections below cover what to inspect, what to replace, and when the factory part is still the better choice.
The Three OEM Hardware Families
OEM fairing hardware looks like a random pile of fasteners, but it sorts into three families. Each does a different job, sits in a different place on the bike, and is made from different material. Telling them apart is the first step in deciding what survives an aftermarket swap.
1. Threaded Bolts and Screws
These clamp panels tightly to the subframe and carry the load.
- Mechanical role: Withstand vibration and shear force to hold panels rigid and rattle-free. Standard fairing bolts typically use a fine thread and a soft shoulder washer to avoid cracking plastic.
- Typical location: Structural joints, undertail sections, windscreen brackets, and any point where two panels meet a metal stay.
- Material: Usually zinc-plated or stainless steel for corrosion resistance, while the decorative shoulder or button head may be aluminum or powder-coated alloy.
2. Plastic and Metal Clips
Clips handle the panels you need to pull quickly for service access.
- Mechanical role: Provide a snap-in, semi-permanent grip that locates a panel without clamping it down hard. Fairing clips absorb flex and pop out before the plastic cracks.
- Typical location: Side fairing edges, inner mudguards, trim covers, and heat-shield panels.
- Material: Nylon or ABS for the plastic push-pins and trim trees, with spring steel used for the retaining arms on metal variants.
3. Rubber Grommets and Well Nuts
This group isolates vibration where a hard bolt would do damage.
- Mechanical role: Cushion the panel, seal the mounting hole, and allow controlled movement. Fairing grommets protect soft plastic from a bolt head, while well nuts expand behind the panel to create a reusable threaded anchor.
- Typical location: Windscreen mounts, lower cowls, and any spot where a bolt passes through unsupported plastic.
- Material: EPDM or nitrile rubber for the grommets, and brass or stainless steel inserts bonded into a rubber sleeve for well nuts.
Together these three families carry every panel on the bike, and each one fails in its own way once it is reused on new plastic.
Which Bolts Survive the Swap to Aftermarket Fairings
Once the stock bodywork is off, reusing OEM hardware is the fastest way to hang new panels. Bolts thread back in easily enough, but not all of them deserve a second run. The ones that usually do are the stainless OEM fairing bolts that already clamped the original panels, because they match the thread pitch, shank length, and load path of the mount points they were built for.
Start with pitch and length, because nothing else matters if the fastener will not seat. An M6 x 1.0 bolt will not thread into a captive clip tapped for a 0.75 mm fine pitch, and a bolt that runs 4 mm too long will bottom out before it ever clamps the panel. Then weigh shoulder bolts versus flanged bolts: a shoulder bolt carries shear through its unthreaded shank and locates the panel precisely, which matters when a fairing hole sits close to a frame tab; a flanged bolt spreads clamp load over a wider footprint and resists crushing thin aftermarket plastic. If the OEM used a shoulder where the panel needs lateral location, swapping in a plain flanged bolt lets the fairing walk and crack.
Wear is the next test. Corrosion pits the shoulder where it rides inside the rubber grommet, and stretched threads on an overtightened bolt erase the elastic clamping force that keeps panels from buzzing at speed. Stainless OEM bolts hold up against road salt, brake dust, and rain, so they stay dimensionally accurate for a second service life; painted or plated fasteners chip at the wrench flats and around the shoulder, and the bare steel underneath rusts and seizes in the clip. Hole spacing settles the rest, since aftermarket fairing holes rarely land on the OEM bore centers exactly. Measure center-to-center, check how far the shank protrudes through the new hole, and only then commit to reuse OEM hardware – much the same care you would take on any aftermarket accessory mounting job.
Fairing Mounting Hardware at a Glance
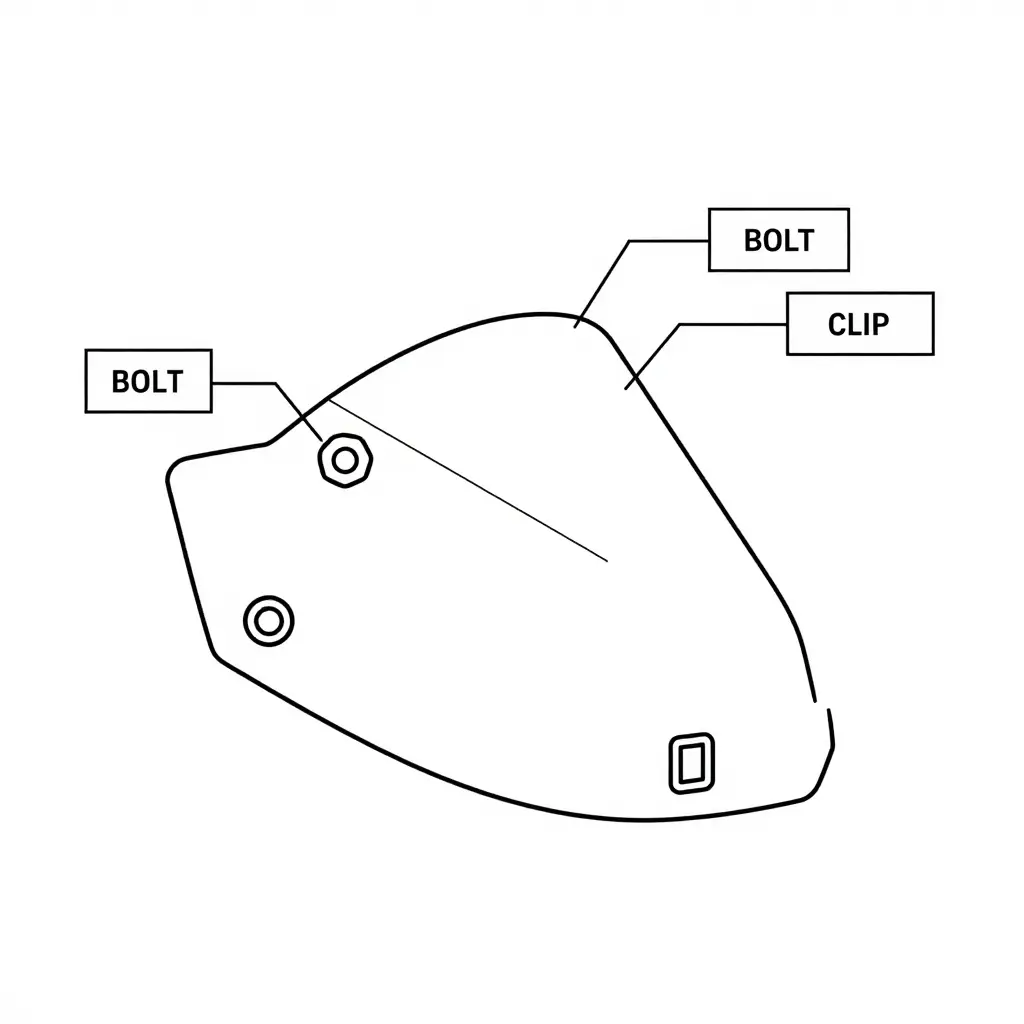
Before you pull panels, it helps to see what hardware lives where. The diagram below maps the three contact points you will deal with on almost any side fairing: the bolt that holds the panel tight, the clip that snaps trim into place, and the grommet that cushions and locates the panel against the frame.
How to Read the Callouts
- Bolt: The threaded fastener that clamps the panel to the subframe. These are the most reusable pieces, as long as the threads and heads are not stripped.
- Clip: The spring-steel or plastic retainer that grips the panel edge. Clips are the most likely to break or lose tension during removal.
- Grommet: The rubber or plastic isolator that sits between the panel and the frame, absorbing vibration and holding alignment.
Treat this diagram as a checklist: before you commit to any aftermarket fairing, confirm each of these three hardware types is present, intact, and matched to the new panel’s mounting holes.
Which OEM Fairing Clips Survive an Aftermarket Fairing Swap?
Bolts usually behave when you fit an aftermarket fairing – it’s the fairing clips that decide whether your panels stay tight at highway speed. Here’s how to judge which clips you can reuse and which belong in the bin.
Push-Pin Clips
Push-pin clips (push rivets) hold inner panels and splash guards, using a center pin that expands the legs. They tolerate a swap well until the pin shaft snaps or strips. If the pin won’t click and stay expanded, replace it – a loose push-pin lets the whole panel float.
Trim Clips
Trim clips grip the thin edges of side panels and seat cowls. They lose bite first, because aftermarket panel thickness often varies from OEM spec. A trim clip that slides in with no resistance will rattle free within a few hundred miles.
Tree Clips
Tree clips use barbed “branches” to bite into a mounting hole. They survive modest gap changes, but when the aftermarket hole runs larger than OEM spec, the barbs never load – so the clip works its way out.
Why Nylon Clips Age Out
Heat cycling from the engine and exhaust, combined with UV exposure, embrittles nylon. Sunny climates accelerate the process. An embrittled clip cracks instead of flexing, so even a gentle pry snaps it. This is the same wear pattern that shortens the life of many aftermarket accessories left exposed to the sun and heat.
Why Bigger Panel Gaps Kill Tension
Slightly larger aftermarket panel gaps reduce the preload an OEM clip needs. The clip sits in the hole but never compresses, so vibration gradually works it loose – even though it looked fine during install.
Inspection Criteria
- Cracked tabs at the clip head
- Missing, bent, or flattened retention barbs
- A center pin that rotates or slides freely
- Stress whitening or a chalky, faded surface
- A clip that seats without an audible click
Discard anything questionable. Fresh clips are cheap insurance compared with a panel flapping at 70 mph.
OEM Hardware Reuse Compatibility
Use this table to judge which OEM fasteners can safely survive the swap onto aftermarket fairings – and which ones you should toss in the bin before they fail mid-ride. The same logic applies to any bolt-on job, from fairings to aftermarket bolt-on components like toppers and racks.
| Hardware Type | Typical Material | Common Failure Mode | Reuse Recommendation | Replacement Priority |
|---|---|---|---|---|
| Bolts | Zinc-plated steel | Thread stretch, head rounding, corrosion pitting | Reuse only if threads and heads are clean; replace any stretched or rounded bolt | Medium – inspect each one |
| Push-pin clips | Nylon | Cracked barbs, snapped center stems | Usually replace; heat cycles make them brittle and grip is lost | High |
| Trim clips | Nylon / ABS | Broken tabs, lost retention | Replace; cheap, and cracked clips rattle loose fast | High |
| Well nuts | Neoprene with brass insert | Hardened rubber, spinning stripped insert | Replace if rubber is stiff or the insert turns freely | Medium-High |
| Rubber grommets | EPDM rubber | Drying, cracking, hardening | Reuse if still pliable; replace if cracked or rock-hard | Medium |
| Shoulder washers | Nylon sleeve over steel | Cracked shoulder, wallowed mounting hole | Replace if cracked or deformed to keep panels snug | Low-Medium |
Quick takeaway for mechanics: soft nylon and rubber parts (push-pins, trim clips, grommets, well nuts) rarely tolerate a second install, while clean, undamaged steel bolts and shoulder washers often earn a second life.
Grommets, Well Nuts, and Shoulder Washers: What Actually Survives a Swap
Rubber components do the hardest work in any fairing assembly. Fairing grommets are the soft interface that lets a bolt clamp a plastic panel without crushing it, while well nuts expand behind thin ABS to create a threaded anchor that simply wouldn’t exist otherwise. During a swap, how these parts behave comes down almost entirely to age. Rubber doesn’t fail suddenly – it fails gradually through compression set, the tendency of a squeezed grommet to stay flattened instead of springing back to shape. Stack on years of heat cycling, UV exposure, and ozone, and the rubber hardens into something closer to brittle plastic than a compliant cushion. Shoulder washers follow the same curve: their job is to center the fastener and spread clamp load, but a stiff or worn washer just transfers stress straight into the panel.
Then there’s the hole question. OEM mounting hardware is engineered around one specific hole diameter, wall thickness, and grommet durometer. Aftermarket ABS fairings come from different tooling, so their holes routinely run a millimeter or two off – sometimes larger, sometimes undersized. A grommet that seated perfectly in the factory panel may now spin loose, or bind so tightly it tears during installation. Shoulder washers only help when their step matches the panel’s counterbore; mismatched geometry means the bolt loads the plastic edge instead of the rubber, and the mount starts failing from day one. This is a common snag in aftermarket upfitting projects, where factory tolerances rarely map cleanly onto third-party panels.
Vibration is where worn grommets announce themselves. Once a grommet hardens or loses its grip, it stops isolating the panel from engine and road frequencies – producing panel buzz, rattles at certain RPMs, and stress cracks radiating outward from the mounting point. As a working rule: soft, pliable grommets with an intact barrel usually survive and can be reused. Hardened, cracked, flattened, or oil-soaked grommets, any well nut whose rubber has gone slick or whose internal threads have stripped, and any shoulder washer missing its raised step should all be replaced. New rubber is cheap; chasing a buzz that cracks a fairing is not.
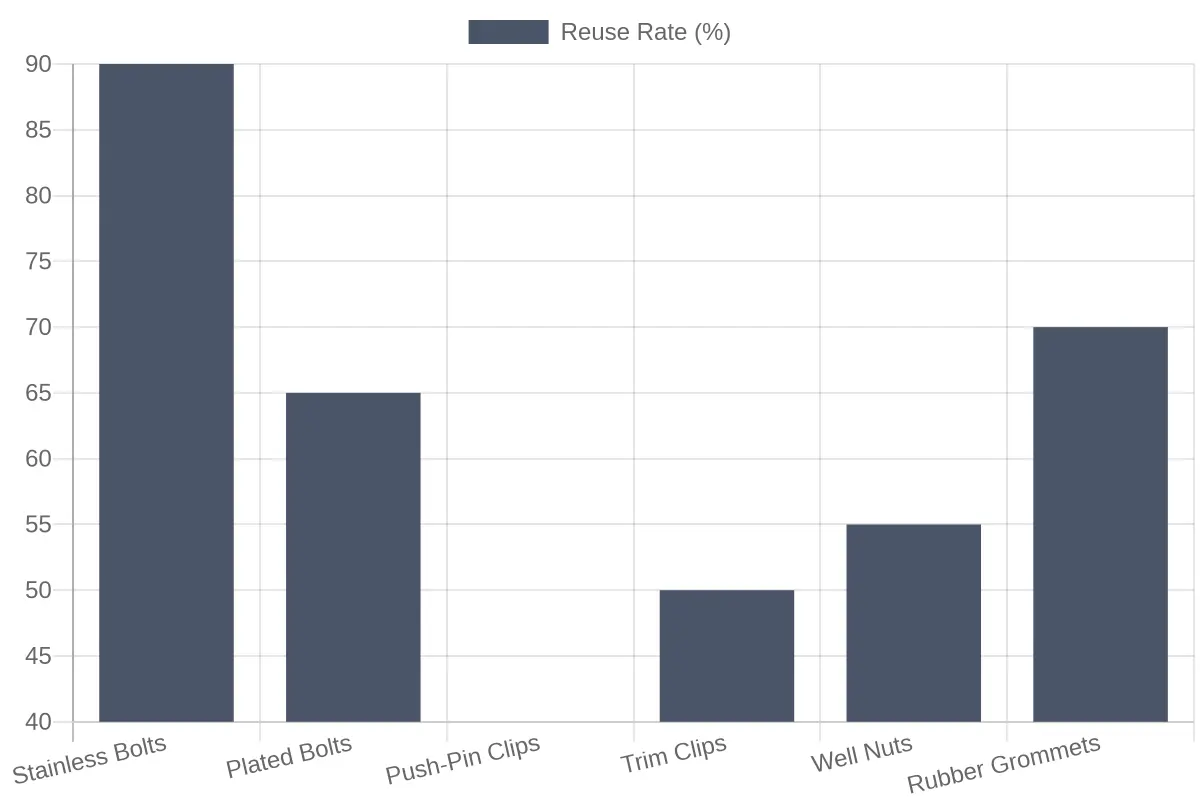
Estimated share of OEM mounting components that remain reusable after a fairing swap. Stainless bolts hold up best at 90%, while push-pin clips are the most likely to be sacrificed at 40%.
Pre-Install Hardware Checklist
Hardware choice is only half the battle. The rest happens on the bench before you mount a single panel, so run this inspection pass on every aftermarket accessory install you take on.
- Verify thread pitch on every reused bolt by test-threading it into a known-good nut before it ever touches the frame.
- Check clip retention by seating each spring clip on its tab and tugging firmly to confirm it snaps back without wobble.
- Test grommet compression by fitting it over the bolt shoulder and confirming the rubber squeezes snugly without cracking or bulging.
- Sort reusable versus replaceable fasteners into two clearly labeled bins so worn parts never sneak back onto the bike.
- Confirm torque values against the manufacturer’s spec sheet and mark each figure next to its location on the panel.
- Inspect bolt shoulders and unthreaded shank lengths to be sure they seat flush against the fairing without bottoming out.
- Scan every fastener for corrosion, cross-threading, or stretched threads, and discard anything that fails a visual check.
- Match fastener grades and plating to the original spec so you do not create a soft-metal weak point at a high-stress mount.
- Confirm hole alignment on the new bodywork before tightening, since forcing a misaligned bolt strips threads fast.
- Count and bag loose hardware per panel, then log the total so nothing disappears between assembly and final fitment.
Best Practices for Reusing OEM Mounting Hardware on Aftermarket Fairings
Salvaging your factory bolts, clips, and grommets is smart money, but reuse only works when every piece is inspected, prepped, and matched to its new home. Build these habits and your panel swap will feel factory-tight.
Clean and chase every thread
Before a single bolt touches a new panel, clean it. Road grime, cured threadlocker, and surface rust hide in the thread valleys and throw off torque readings. Run a thread-chasing tap or die of the exact pitch, then blow out the debris and wipe the flanks. If a bolt needs force to start by hand, the thread is wrong, not stubborn. Replace anything with stretched or rounded heads.
Apply anti-seize with restraint
A thin film on the threads stops steel bolts from seizing in aluminum subframes. Keep it off the bolt head and away from rubber, since petroleum-based paste swells grommets. Copper or nickel blends suit high-heat spots, and a little goes a long way. Over-applying simply attracts grit.
Match grommet diameters to the new holes
This is where most swaps fail. OEM grommets fit OEM hole sizes, and aftermarket fairings rarely match them precisely. Measure the inner diameter of each new hole, then choose a grommet that seats fully without stretching or rattling. Too small and the panel buzzes; too large and the shoulder will not lock. Keep an assortment on hand for tuning gaps.
Store fasteners by position
Bag and label hardware by location, not type. A photo of each stage, taped inside the bag, saves hours on reassembly and prevents the classic leftover-bolt mystery. A labeled grid tray works even better for a full teardown.
Source extras before OEM parts vanish
Discontinued bolts and clips are the real risk when you reuse OEM hardware on aftermarket fairings. Buy spares while they are still listed, cross-reference part numbers across model years, and note the thread pitch so a generic equivalent can fill the gap later.
How manufacturers can standardize mounting kits
Fairing makers can end the guesswork by publishing standardized mounting kits: a common grommet diameter, documented torque values, and a labeled hardware map per model. That consistency helps shops and riders alike, much like the tidy bolt-on logic behind quality aftermarket truck accessories. Standard kits turn a fiddly swap into a repeatable one.
Frequently Asked Questions: Reusing OEM Hardware on Aftermarket Fairings
Reusing your original bolts, clips, and grommets can save money and keep the fit consistent. The answers below cover the questions owners, shops, and manufacturers ask most often.
Do OEM fairing bolts fit aftermarket fairings?
In most cases, yes. Factory fairing bolts use standard M5 or M6 threads with captured washers, and most aftermarket fairings copy the OEM mounting points, so the original hardware threads in cleanly. The risk is length: if the new panel is thicker or thinner than stock, a bolt can bottom out or leave too little engagement. Target at least 6 to 8 mm of thread contact, and measure before you force anything.
Can I reuse grommets after removing them?
Often yes, but inspect each one first. Rubber and neoprene grommets harden and crack with age and UV exposure, and prying them out can tear the flange. If a grommet is still soft and seated snugly, reuse it; if it crumbles or no longer grips the bolt, replace it. Fresh grommets are inexpensive and prevent rattles and panel wear.
Why do fairing clips break during a swap?
Fairing clips are usually single-use fasteners made of brittle nylon or ABS. They are designed to flex once during assembly, so the pull-out force of disassembly often snaps a leg or tab. Cold weather makes them even more brittle. Keep a spare set on hand and use a proper trim tool instead of a flathead screwdriver to reduce breakage.
Is anti-seize recommended on fairing bolts?
For steel fasteners threading into aluminum frames or inserts, a thin coat of anti-seize is worthwhile. It prevents galvanic corrosion and seizing, which matters on bikes ridden in rain or coastal air. Use it sparingly on the threads only, and avoid it on bolts that require thread-locking compound.
How tight should fairing bolts be torqued?
Fairing bolts are small and easy to overtighten, which cracks plastic and strips inserts. Follow the manual when available; otherwise use these general guidelines and always tighten by hand with a calibrated inch-pound wrench.
| Bolt size | Typical torque | Common use |
|---|---|---|
| M5 | 4-5 Nm (35-44 in-lb) | Small fairing bolts |
| M6 | 7-9 Nm (62-80 in-lb) | Main fairing bolts |
| M6 (into plastic) | 5-6 Nm (44-53 in-lb) | Panels with inserts |
For hands-on vehicle modification projects, the same rule applies: snug, not brutal. Overtorquing is the leading cause of cracked aftermarket fairings.
Should I replace clips and grommets, or keep the originals?
Replace what is brittle and keep what is elastic. Mixing reused fairing clips with new grommets is fine, as long as every fastener grips firmly and the panel sits flush. If you hear buzzing at speed or see gaps, the reused hardware is the first thing to check.

